simplin simplin
simplin.ai 홈simplin.ai
사장님용 · simplin.ai 웹 대시보드For owners · the simplin.ai web dashboard

Simplin 시작하기: 가입부터 첫 출근까지 Getting started with Simplin: from sign-up to the first clock-in

가입은 5분이면 끝납니다. 가입이 확인되면 Simplin이 매장 전용 NFC 스티커를 만들어 보내드리고, 스티커가 오는 동안 사장님은 직원 등록과 스케줄을 준비해 두시면 됩니다. 스티커가 도착하기 전에도 직원들은 매장 안에서 PIN으로 출퇴근을 찍을 수 있습니다. 이 가이드는 그 순서를 화면 그대로 안내합니다. Signing up takes about five minutes. Once your account is confirmed, Simplin makes an NFC sticker for your store and ships it to you. While it is on the way, add your staff and set up a schedule. Staff can already clock in with a PIN inside the store before the sticker arrives. This guide walks through that order, screen by screen.

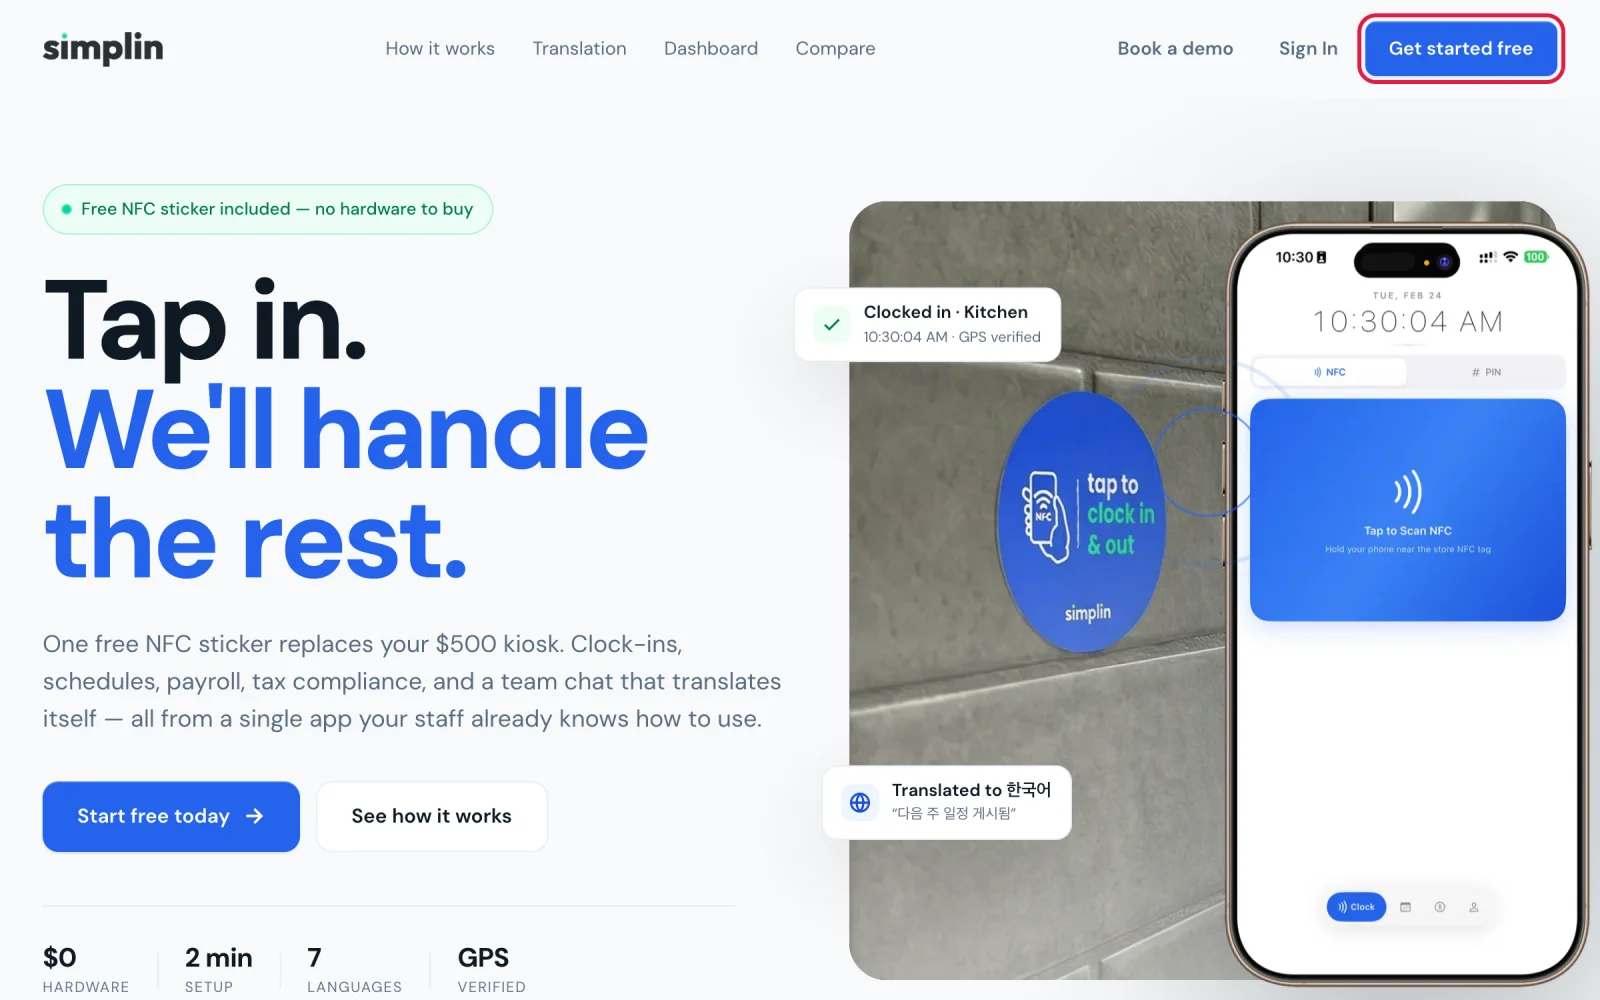
simplin.ai home page with the Get started free button highlighted
오늘Today

가입하고 대시보드 열기Sign up and open the dashboard

비즈니스 정보와 매장 주소를 넣으면 계정과 매장이 함께 만들어집니다. 주소가 곧 출퇴근 위치 기준입니다.Enter your business details and store address. The account and the store are created together, and the address becomes the clock-in location.

스티커 오는 동안While the sticker ships

직원 등록, 초대, 스케줄Add staff, invite them, publish a schedule

직원을 등록하고 초대 링크를 보내면 직원 앱이 연결됩니다. 그때부터 매장 안에서 PIN으로 출퇴근이 됩니다.Add employees and send invite links. Once their app is connected, they can clock in with a PIN inside the store.

스티커 도착Sticker arrives

붙이면 끝Stick it on the wall

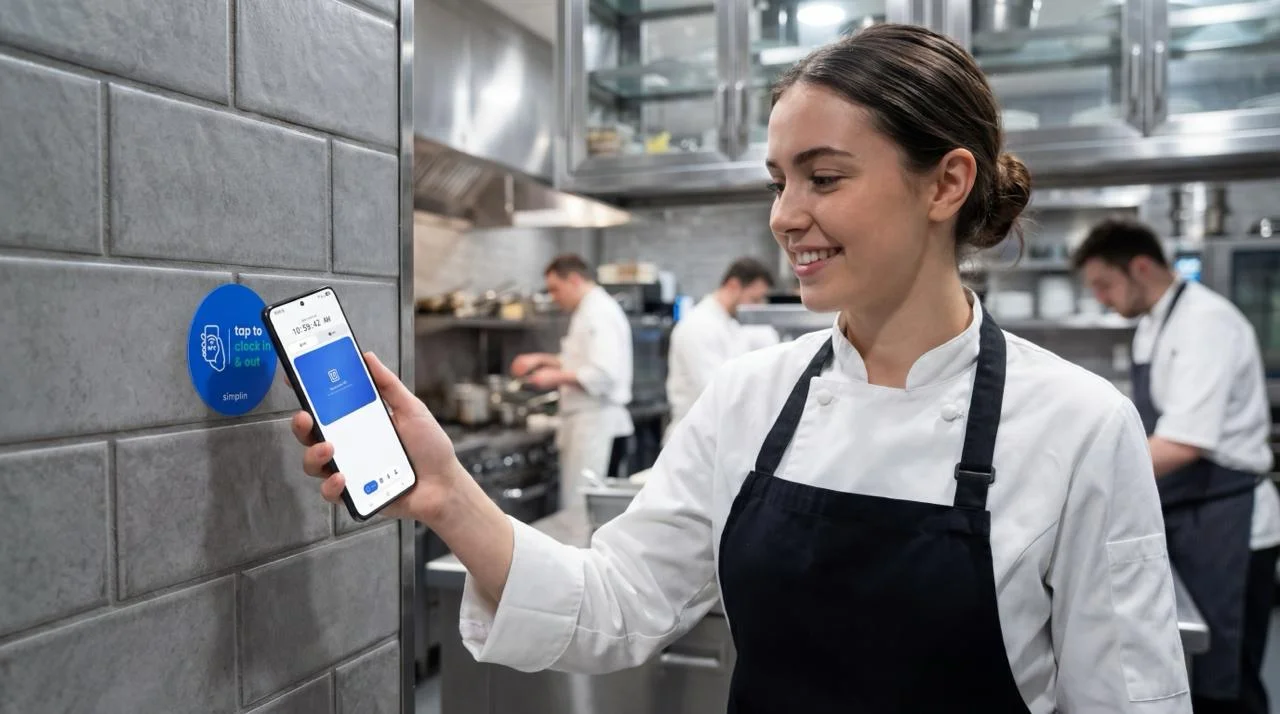
스티커는 매장에 맞게 등록된 상태로 옵니다. 직원 출입구에 붙이는 순간부터 폰을 갖다 대면 출근입니다.The sticker arrives already registered to your store. Put it by the staff entrance and a tap of the phone is a clock-in.

1

simplin.ai에서 비즈니스를 등록하세요Register your business on simplin.ai

컴퓨터에서 하는 것이 편합니다. 한 화면짜리 폼 하나로 계정과 첫 매장이 함께 만들어집니다.A computer is easiest. One form creates both your account and your first store.

  1. simplin.ai에 접속해 오른쪽 위의 파란색 Get started free 버튼을 누르세요.Go to simplin.ai and press the blue Get started free button at the top right.
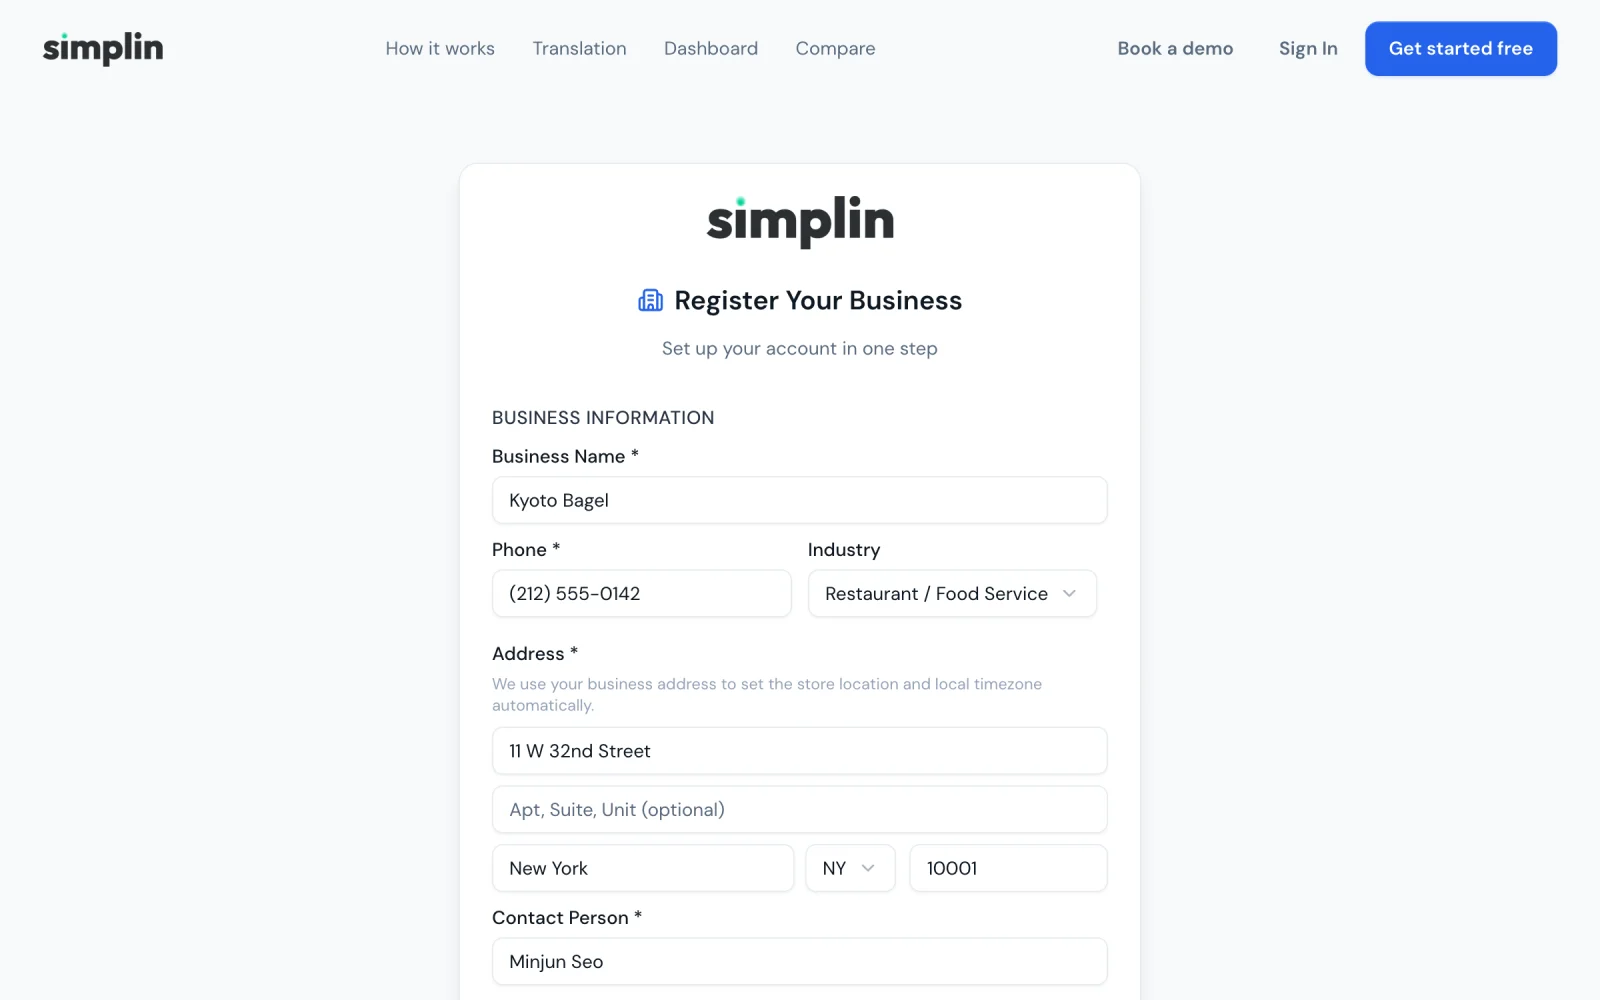
  2. Business Name(상호), Phone, Industry(업종)를 입력하세요. 상호는 직원 앱과 초대 링크에 그대로 표시됩니다.Fill in Business Name, Phone, and Industry. The business name is what staff see in the app and on the invite link.
  3. Address에 매장 주소를 정확히 입력하세요. 이 주소가 출퇴근 위치 확인의 기준이 되고, 매장의 시간대도 여기서 자동으로 정해집니다.Enter the store's exact Address. It becomes the reference point for location checks at clock-in and sets the store's time zone automatically.
  4. Contact Person에 사장님 이름, Email에 앞으로 로그인에 쓸 이메일을 넣고 비밀번호를 두 번 입력하세요.Enter your name under Contact Person, the email you will sign in with, and a password twice.
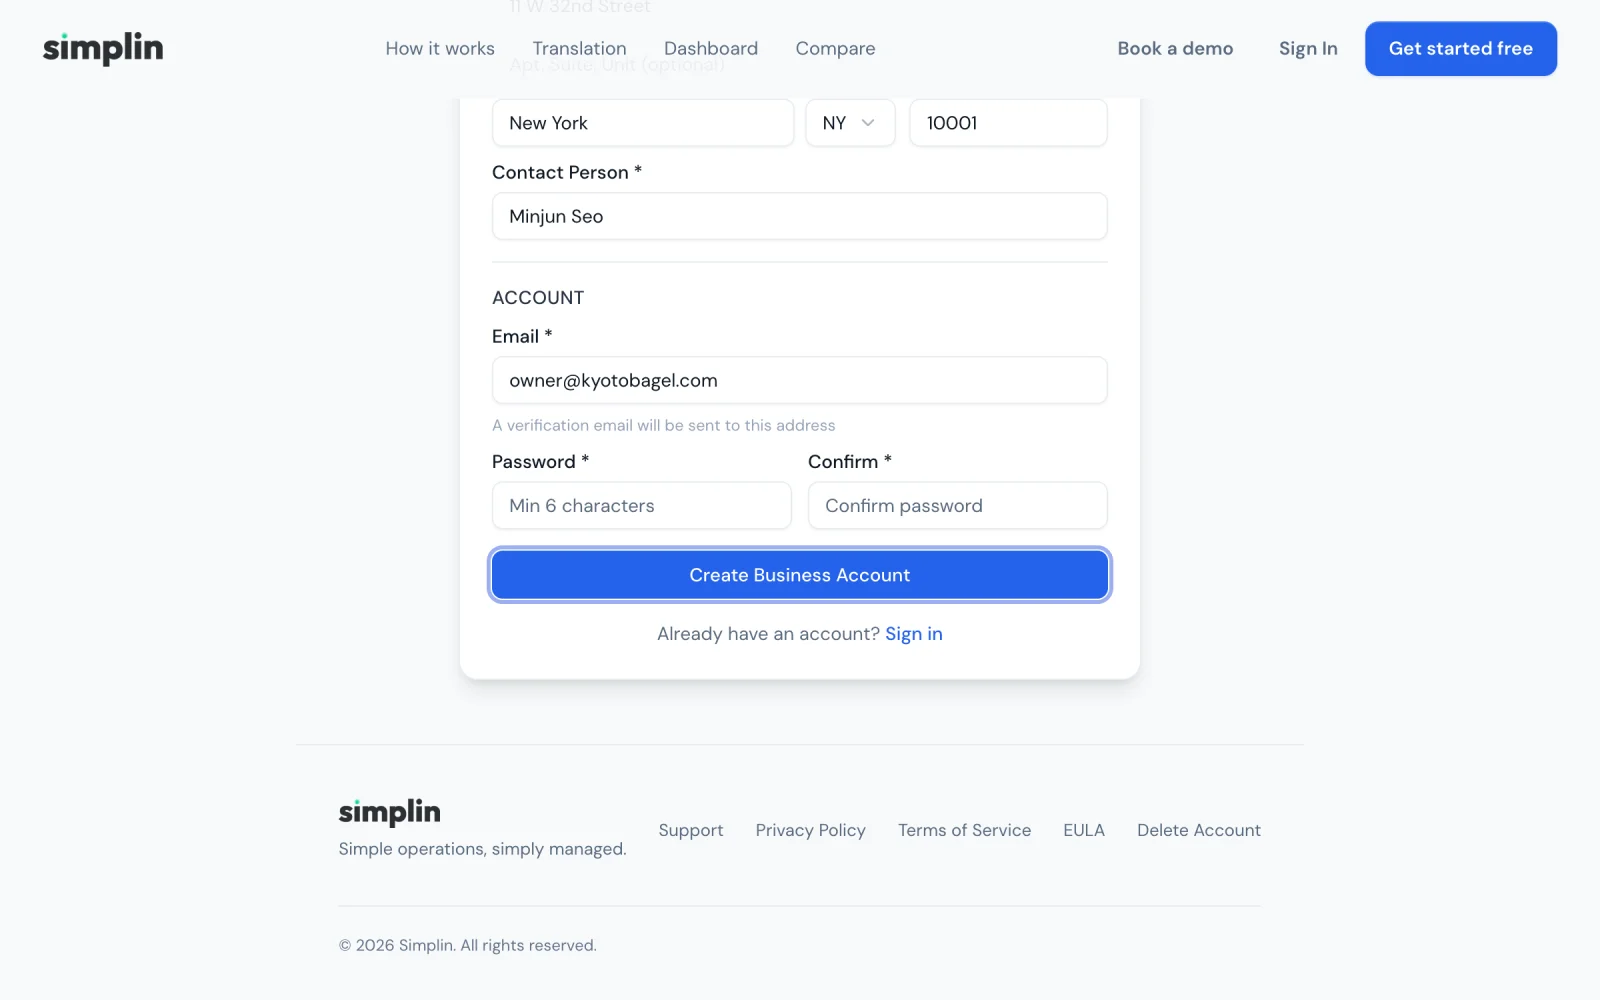
  5. 맨 아래 Create Business Account를 누르세요.Press Create Business Account at the bottom.
주소가 가장 중요합니다.The address matters most. 직원이 출퇴근을 찍으려면 폰이 이 주소 근처(기본 50m)에 있어야 합니다. 건물 이름이 아니라 번지수가 있는 도로명 주소를 넣어 주세요. 나중에 Settings에서 고칠 수 있습니다. Staff can only clock in when their phone is near this address (50 m by default). Use a street address with a number, not a building name. You can fix it later in Settings.
Register Your Business form with business name, phone, industry, and address filled in
Bottom of the registration form with the Create Business Account button highlighted

그다음, 이메일을 확인하세요Then check your email

  1. 버튼을 누르면 Check your email 화면이 나오고, 입력한 주소로 확인 메일이 갑니다.After you press the button you see a Check your email screen, and a verification email goes to the address you entered.
  2. 메일 안의 링크를 누르면 계정이 확인되고 바로 대시보드로 들어갑니다.Click the link in the email. Your account is verified and you land in the dashboard.
  3. 메일이 안 보이면 스팸함을 확인하세요. 보낸 사람은 Simplin입니다.If you do not see it, check your spam folder. The sender is Simplin.
NFC 스티커는 이때 준비됩니다.This is when your NFC sticker gets made. 가입이 확인되면 Simplin이 매장 정보에 맞춰 스티커를 등록·제작해서 가입 시 입력한 주소로 보내드립니다. 따로 신청할 것은 없습니다. 궁금한 점은 support@simplin.ai로 문의하세요. Once your account is confirmed, Simplin registers and prints a sticker for your store and ships it to the address you signed up with. There is nothing to order. Questions go to support@simplin.ai.
Check your email
We sent a verification link to
owner@kyotobagel.com
Click the link in the email to verify your account and complete setup. The link will redirect you to your dashboard.
가입 직후 나오는 화면The screen right after sign-up
2

로그인하고 매장 설정을 한 번 확인하세요Sign in and check the store settings once

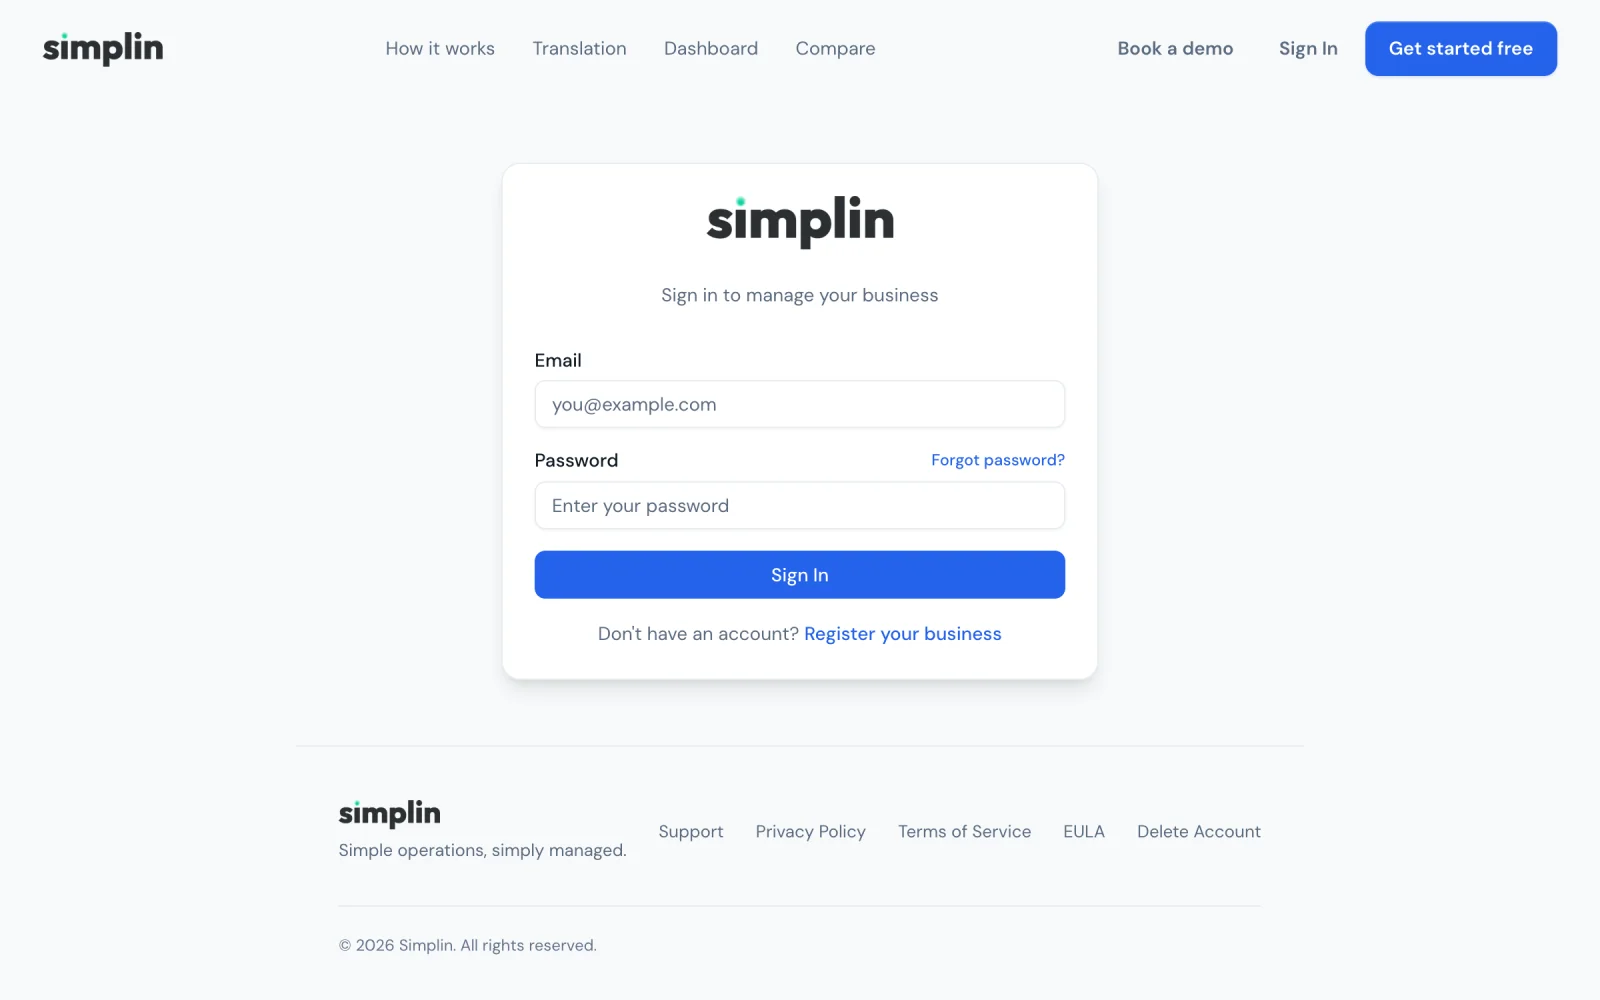
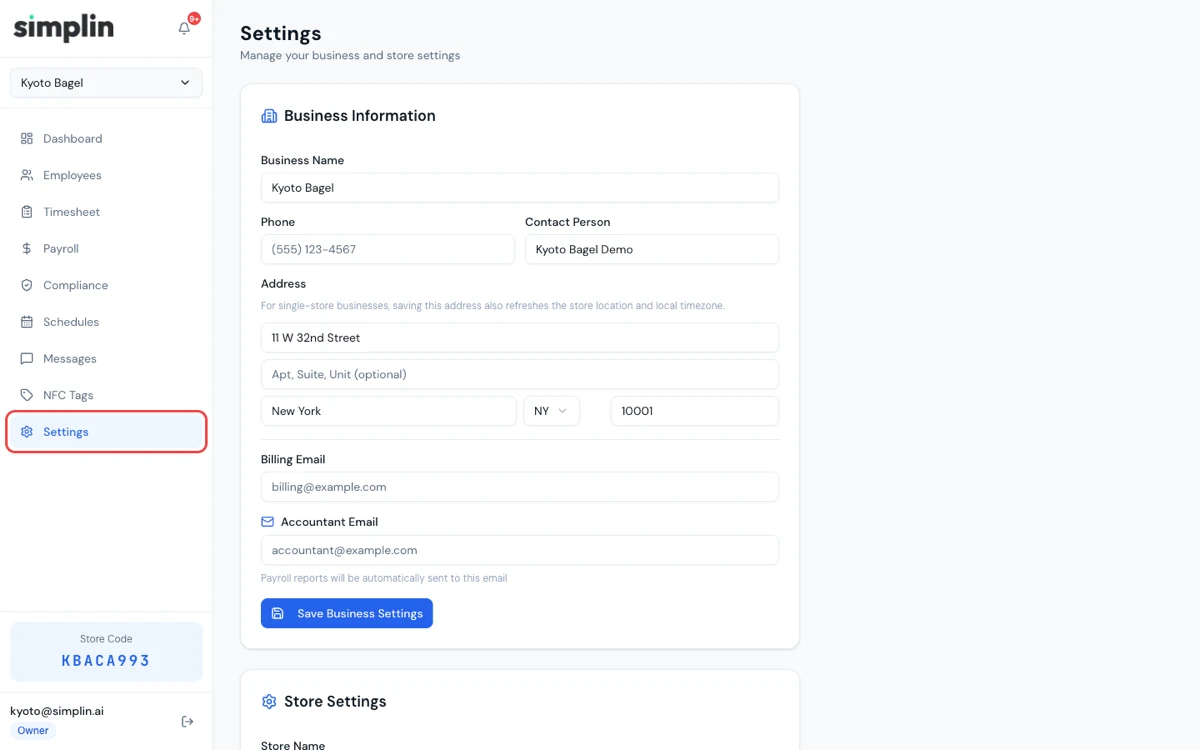
대시보드는 simplin.aiSign In으로 들어갑니다. 처음 들어가면 Settings만 한 번 보고 지나가면 됩니다.Open the dashboard through Sign In on simplin.ai. On the first visit, a quick look at Settings is all you need.

  1. 가입할 때 쓴 이메일과 비밀번호로 로그인하세요.Sign in with the email and password from sign-up.
  2. 왼쪽 메뉴 맨 아래 Settings를 누르고 Business Information의 주소가 맞는지 확인하세요. 틀렸으면 고치고 Save Business Settings를 누르면 매장 위치와 시간대가 같이 갱신됩니다.Open Settings at the bottom of the left menu and check the address under Business Information. If it is wrong, fix it and press Save Business Settings. The store location and time zone update with it.
  3. 왼쪽 아래 Store Code(8자리)를 기억해 두세요. 초대 링크가 없을 때 직원이 앱에서 매장을 찾는 코드입니다.Note the 8-character Store Code at the bottom left. Staff use it in the app to find your store when they do not have an invite link.
Accountant Email을 넣어 두면Add an accountant email 급여를 마감할 때마다 리포트가 그 주소로 자동 발송됩니다. 지금 안 넣어도 됩니다. and every finalized payroll report is emailed there automatically. It is fine to leave it for later.
simplin.ai sign-in page
Settings page showing business information, address, and the store code
3

직원을 등록하세요Add your employees

이름과 이메일만 있으면 됩니다. 세금 서류는 나중에 채워도 급여 계산 전까지는 문제없습니다.A name and an email are enough to start. Tax details can wait until before the first payroll.

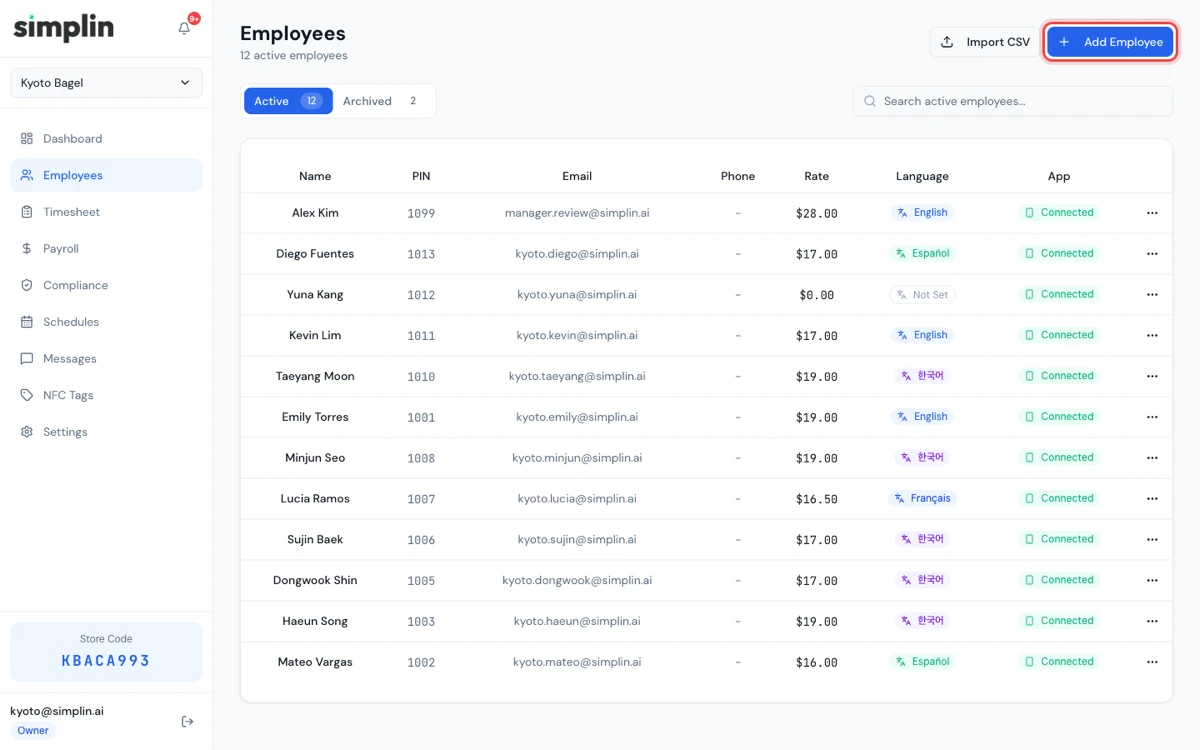
  1. 왼쪽 메뉴에서 Employees를 누르고 오른쪽 위 + Add Employee를 누르세요.Open Employees in the left menu and press + Add Employee at the top right.
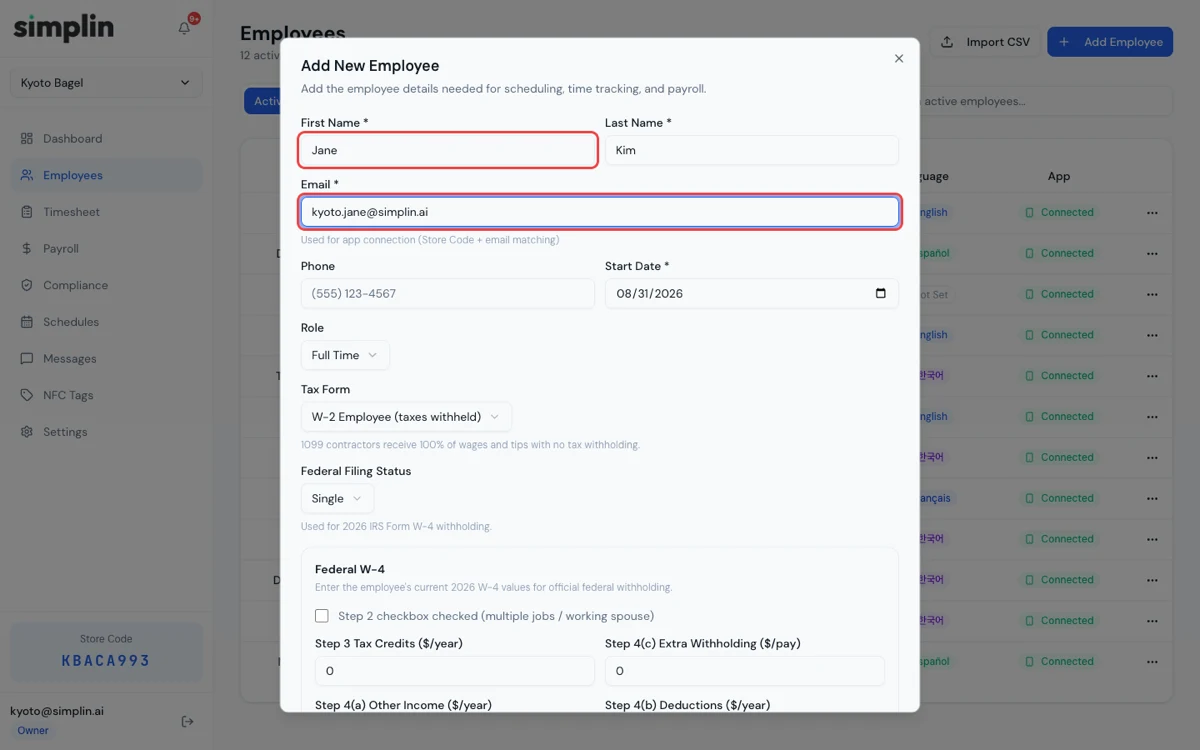
  2. First Name, Last Name, Email을 입력하세요. 이메일이 제일 중요합니다. 초대 링크가 이 주소에 묶이고 직원 앱 계정도 이 주소로 만들어집니다.Enter First Name, Last Name, and Email. The email matters most: the invite is tied to it and the employee's app account is created with it.
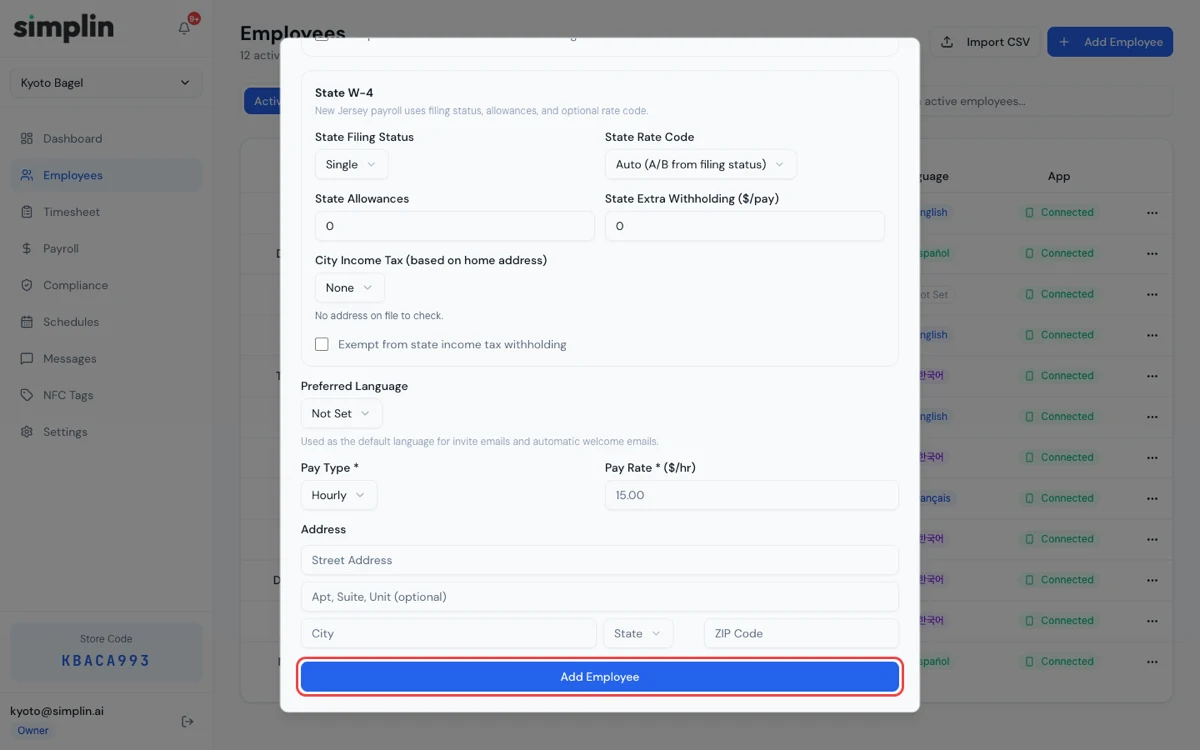
  3. Pay Rate(시급)와 Role을 넣어 두면 급여와 스케줄 화면에서 바로 쓰입니다.Add Pay Rate and Role now if you can. Payroll and the schedule use them right away.
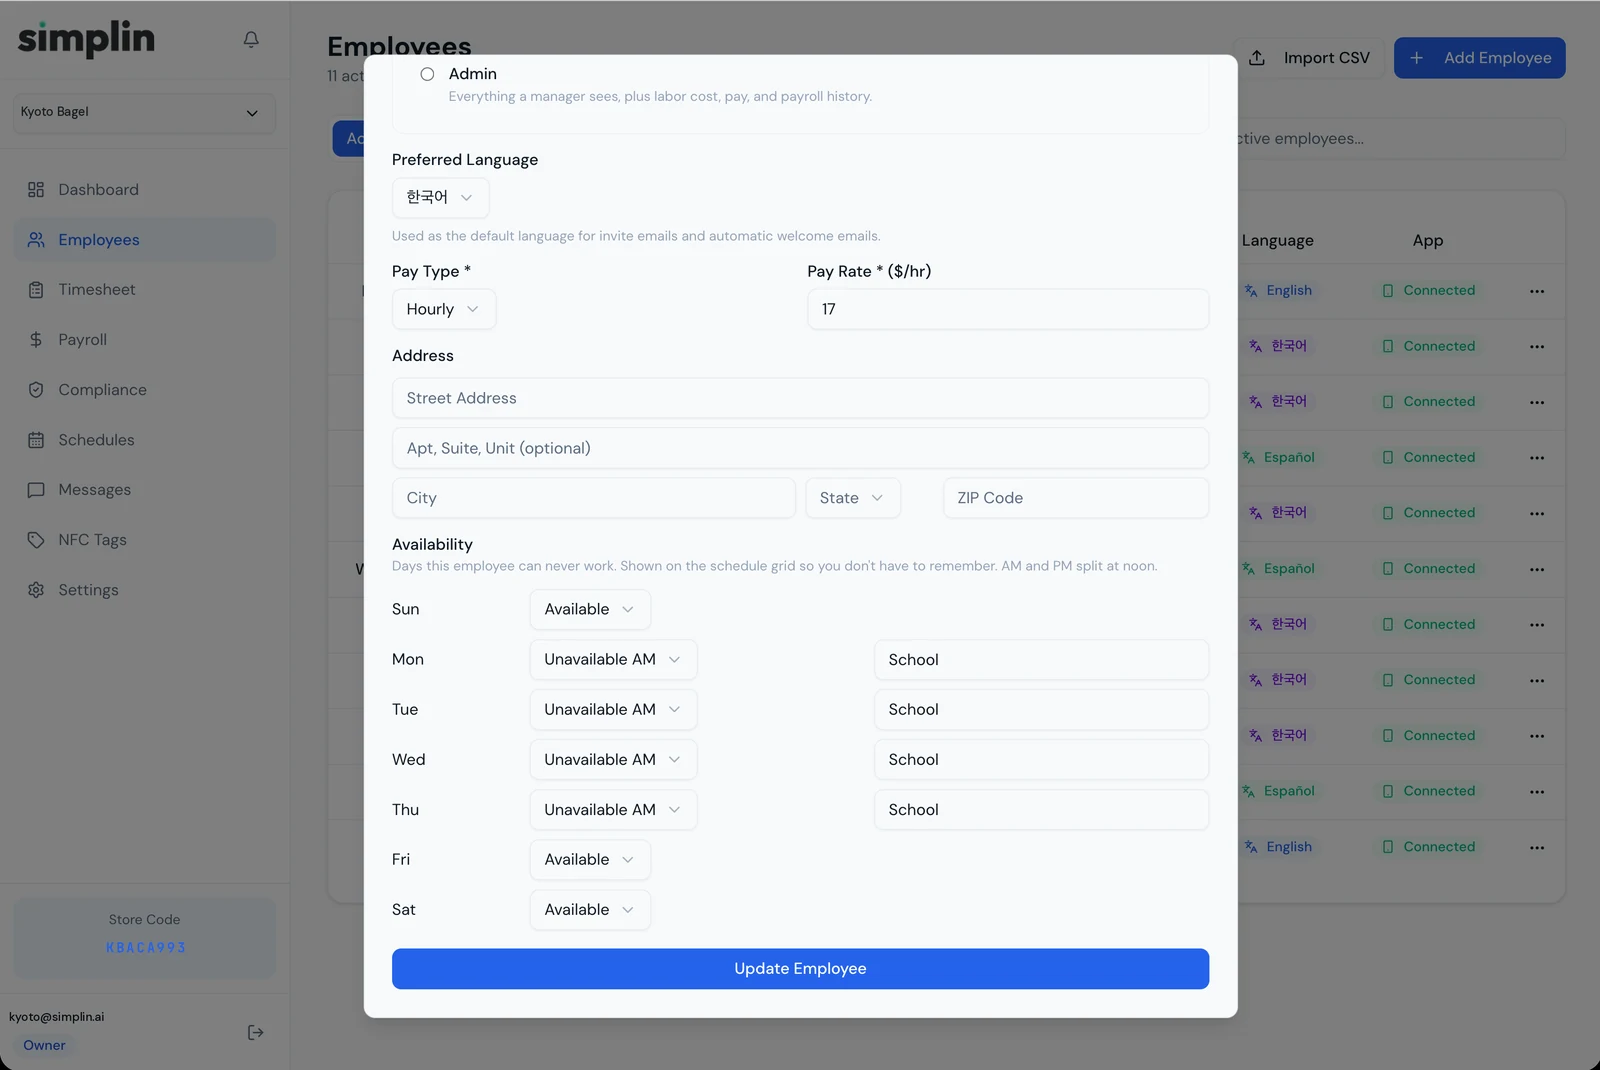
  4. 창 아래쪽 Availability에서 그 직원이 일할 수 없는 요일을 Unavailable AM / PM / All day로 표시하고 사유(예: School)를 적어 두세요. 스케줄 표의 해당 칸에 Unavailable로 표시되어 기억하지 않아도 됩니다.Under Availability at the bottom, mark the days this person can never work as Unavailable AM / PM / All day with a note such as School. Those cells show Unavailable on the schedule grid so you do not have to remember.
  5. 창을 아래로 내려 Add Employee를 누르면 끝입니다. 출퇴근용 PIN은 자동으로 만들어집니다.Scroll down and press Add Employee. A clock-in PIN is generated automatically.
직원이 많다면 CSV로 한 번에.Many employees? Use CSV. Employees 화면의 Import CSV를 누르면 템플릿을 내려받을 수 있습니다. 엑셀에서 이름, 이메일, 시급을 채워 저장한 뒤 올리면 여러 명이 한 번에 등록됩니다. Press Import CSV on the Employees page to download a template. Fill in names, emails, and pay rates in Excel, save, and upload to add everyone at once.
Employees page with the Add Employee button highlighted
Add New Employee form with the name and email fields highlighted
Bottom of the employee form with the Add Employee save button highlighted
Employee form showing Manager App Access and the Availability section with weekday unavailability and a School note
4

직원에게 초대 링크를 보내세요Send each employee an invite link

링크 하나면 직원 폰에 앱이 설치되고 매장이 연결됩니다. 매장 코드도, 인증 메일도 직원이 따로 다룰 일이 없습니다.One link installs the app on the employee's phone and connects them to your store. No store code, no verification email for them to deal with.

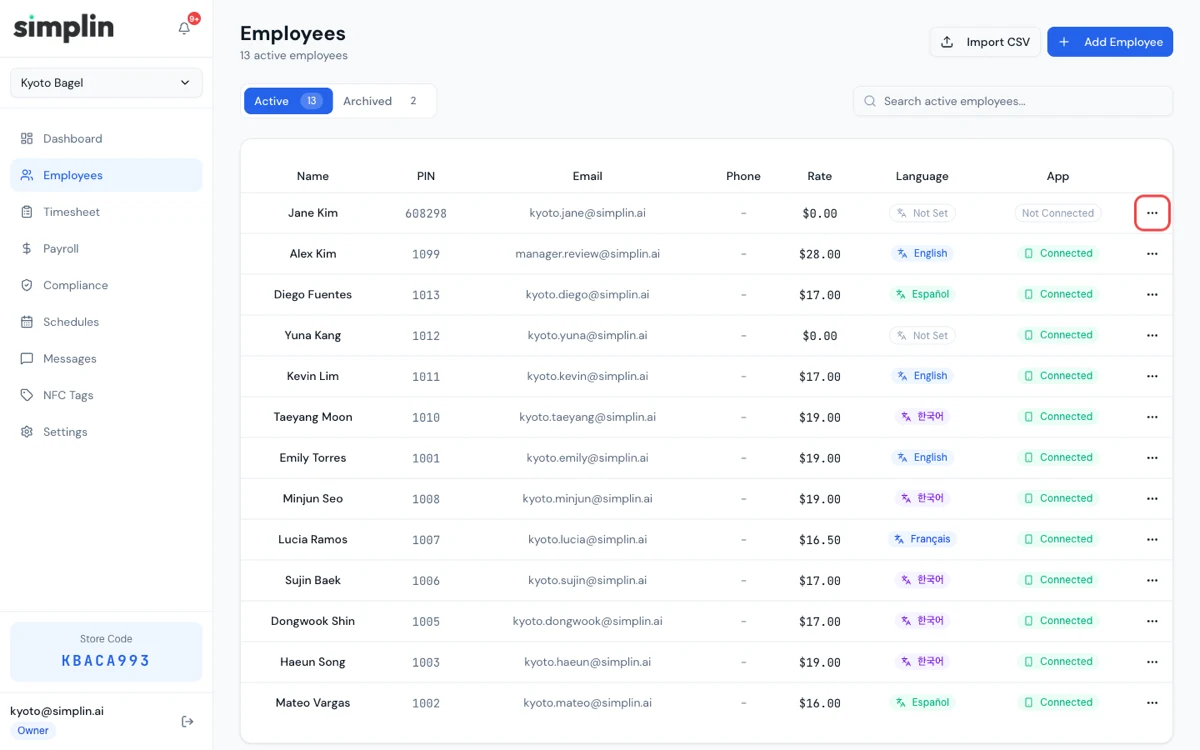
  1. Employees 목록에서 직원 줄 맨 오른쪽의 버튼을 누르세요.In the Employees list, press at the right end of the employee's row.
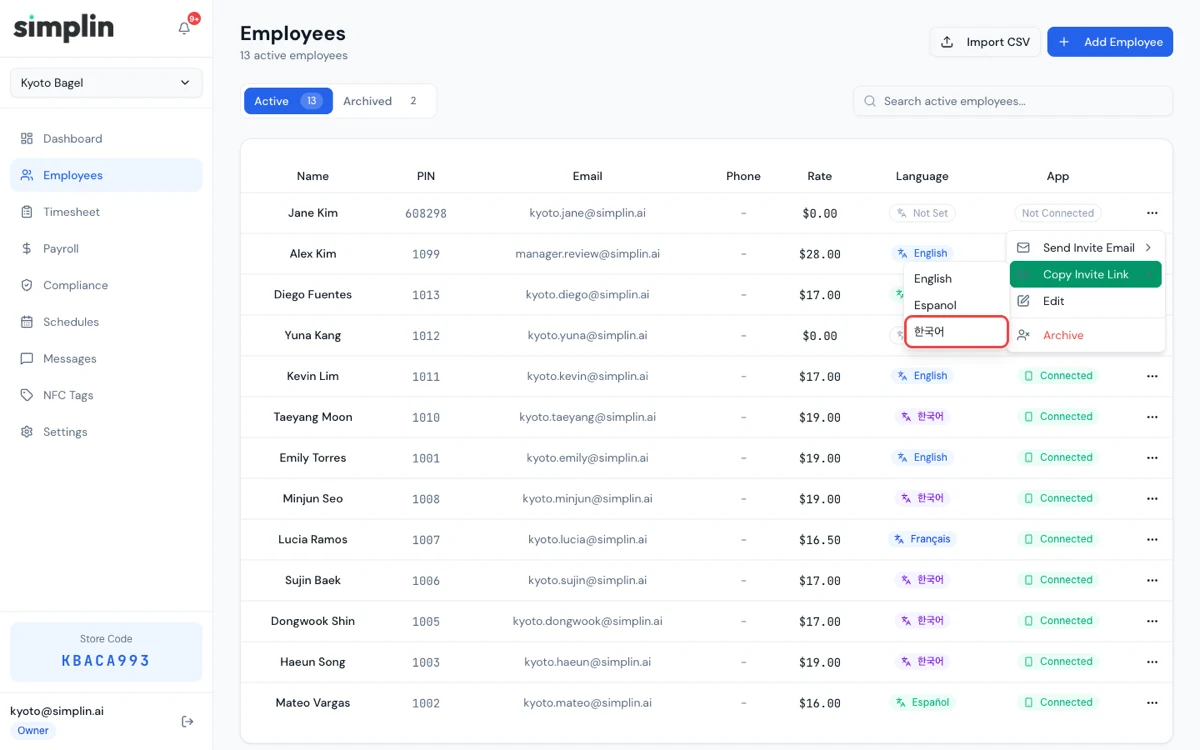
  2. Copy Invite Link에 마우스를 올리고 직원이 쓰는 언어를 고르세요. 링크가 복사됩니다.Hover Copy Invite Link and pick the employee's language. The link is copied.
  3. 카카오톡이나 문자로 그 직원에게 붙여넣어 보내세요. 사장님이 할 일은 여기까지입니다.Paste it into a text or KakaoTalk message to that employee. That is all you need to do.
  4. 이메일로 보내고 싶으면 같은 메뉴의 Send Invite Email을 누르세요.Prefer email? Press Send Invite Email in the same menu.
링크는 14일 동안 유효합니다. 새로 만들면 이전 링크는 무효가 됩니다. 직원 폰에서 어떻게 진행되는지는 직원 앱 가이드에 있습니다. A link stays valid for 14 days. Creating a new one cancels the old one. What happens on the employee's phone is covered in the employee app guide.
Employee row with the three-dot menu button highlighted
Copy Invite Link submenu with language options

직원 폰에서는 이렇게 보입니다What the employee sees

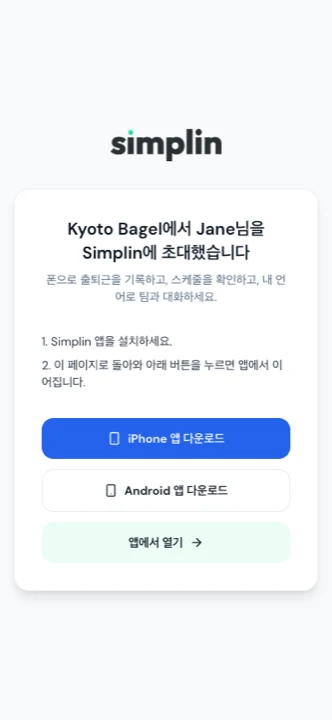
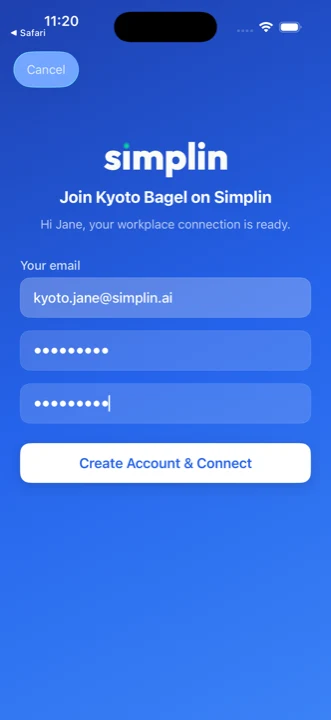
링크를 누르면 앱 설치 안내가 뜨고, 설치 후 링크를 한 번 더 누르면 매장 이름과 이메일이 채워진 화면이 열립니다. 직원은 비밀번호만 정하면 바로 출퇴근 화면으로 들어갑니다.Tapping the link shows an install page. After installing, tapping the link again opens a screen with the store name and email already filled in. The employee sets a password and lands on the clock screen.

Invite landing page prompting to install the Simplin app
앱 설치 안내Install prompt
Invite screen in the app with store name and email prefilled
매장·이메일이 채워진 가입 화면Sign-up with store and email prefilled
5

첫 주 스케줄을 올리세요Publish the first week's schedule

스케줄이 있어야 지각과 미출근 알림이 나가고, 직원 앱에도 근무 시간이 표시됩니다.A published schedule is what drives late and no-show alerts, and it is what staff see in their app.

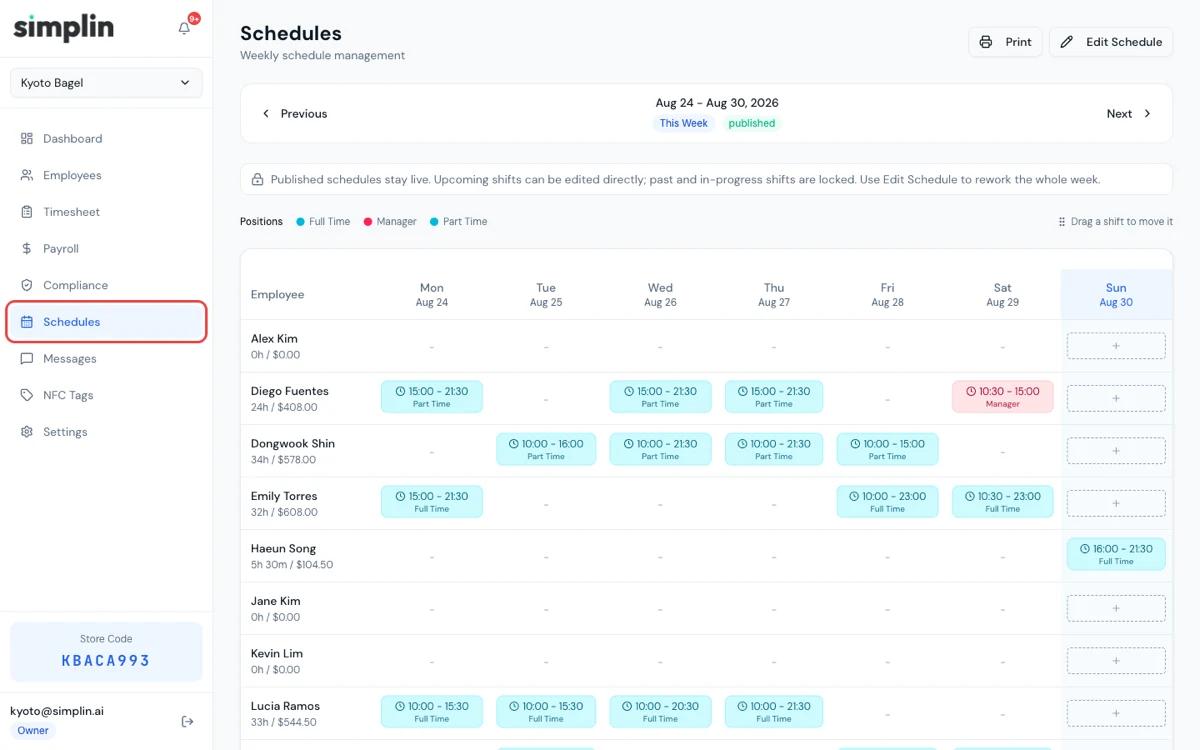
  1. 왼쪽 메뉴에서 Schedules를 누르세요.Open Schedules in the left menu.
  2. 직원 줄의 요일 칸 +를 눌러 시작·종료 시간과 포지션을 넣으세요. 지난주를 그대로 복사하는 버튼도 있습니다.Press + in a day cell on the employee's row and enter start, end, and position. There is a button to copy last week as well.
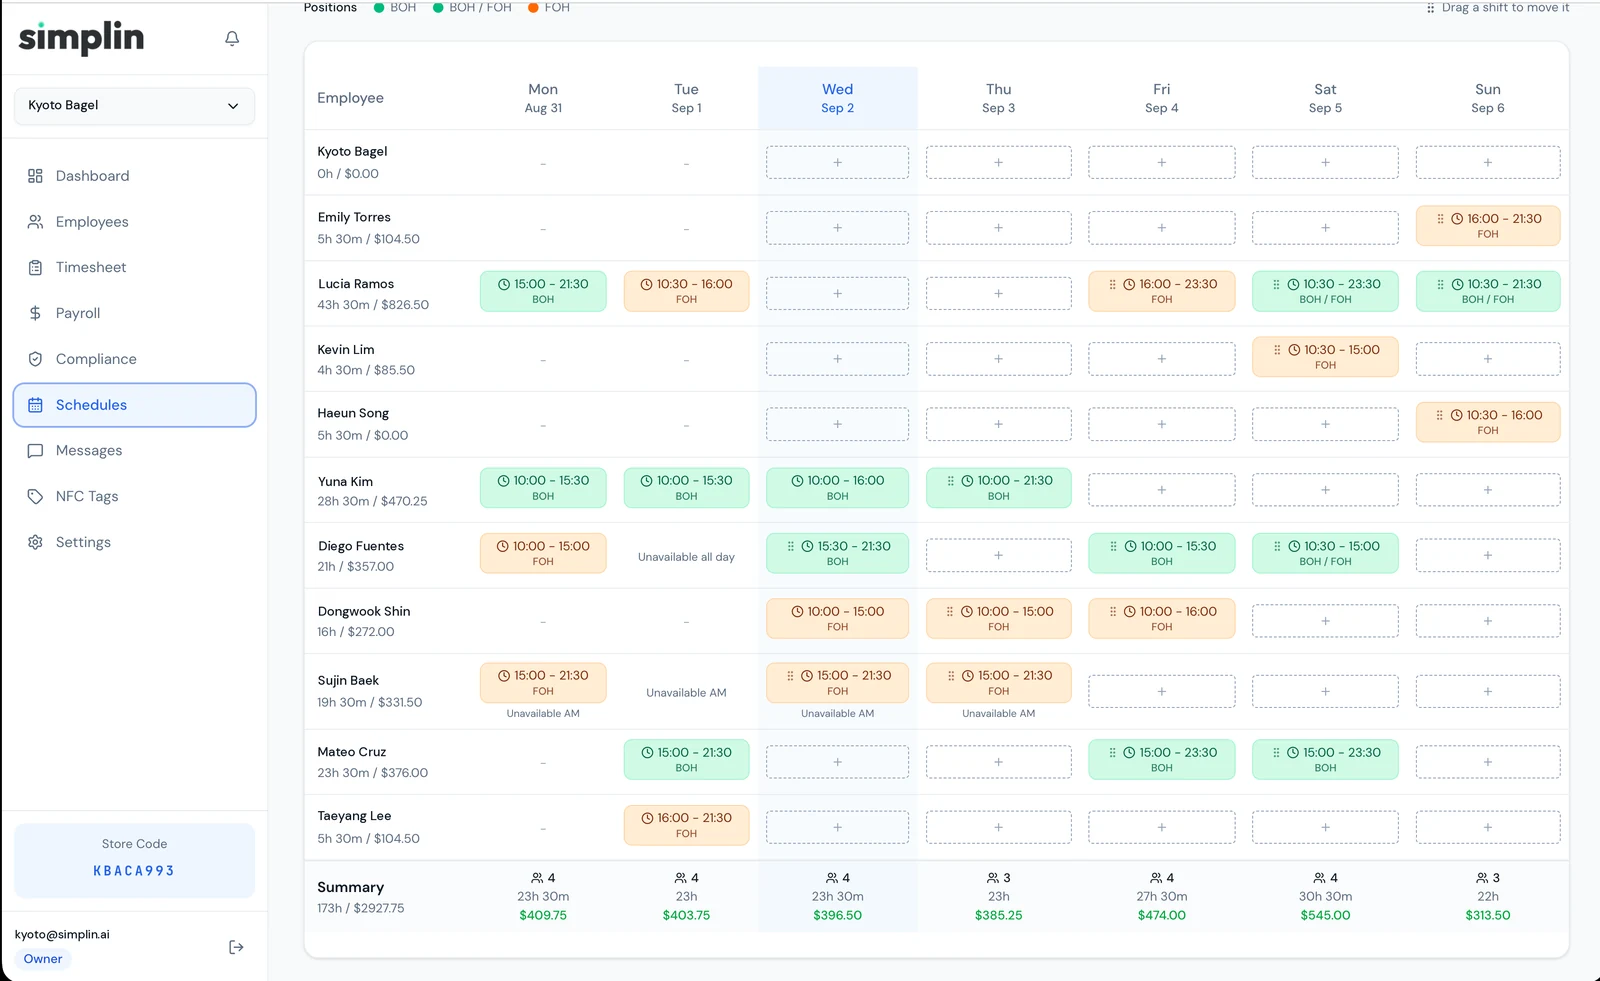
  3. 근무 시간을 옮기고 싶으면 칸을 드래그해서 다른 요일이나 다른 직원 줄에 놓으세요. 직원 정보에 적어 둔 근무 불가 요일은 Unavailable AM, Unavailable all day로 표시되어 그 칸을 피해 짤 수 있습니다.To move a shift, drag the cell to another day or another employee's row. Days marked in the employee record show as Unavailable AM or Unavailable all day so you can plan around them.
  4. 한 주가 채워지면 Publish를 누르세요. 그 즉시 직원 앱에 반영됩니다.When the week is filled in, press Publish. It shows up in the employee app immediately.
Schedules page with a weekly schedule
Published weekly schedule grid with positions, Unavailable markers, drag handles, and the daily summary row
6

출퇴근을 시작하세요: 스티커 전에는 PIN, 도착하면 NFCStart clocking in: PIN before the sticker, NFC after

앱이 연결된 직원은 스티커가 오기 전에도 출퇴근을 찍을 수 있습니다. 어느 방법이든 폰이 매장 근처에 있어야만 기록됩니다.Connected staff can clock in before the sticker arrives. Either way, the phone has to be near the store for the entry to count.

스티커 도착 전: 앱의 PIN 탭Before the sticker: the PIN tab in the app

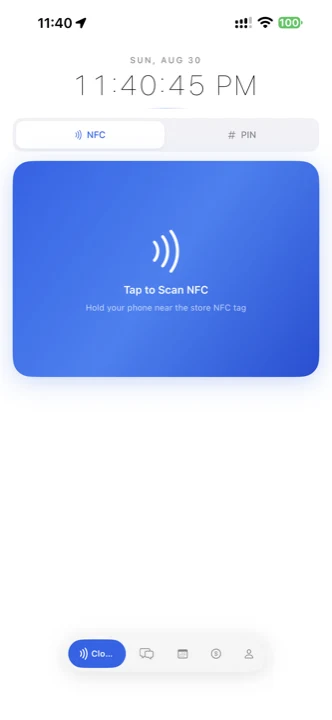
직원 앱의 Clock 화면 위쪽에서 PIN을 고르고 본인 PIN을 입력하면 출근이 찍힙니다. PIN은 Employees 화면의 직원 상세에서 볼 수 있습니다. 폰 위치가 매장 반경 밖이면 기록되지 않으니 집에서 찍는 일은 생기지 않습니다.On the Clock screen of the employee app, choose PIN at the top and enter the personal PIN. The PIN is shown in the employee's detail on the Employees page. Outside the store radius nothing is recorded, so nobody can clock in from home.

스티커 도착 후: 갖다 대면 끝After the sticker: just tap

스티커는 매장에 등록된 채로 옵니다. 직원 출입구나 주방 입구처럼 모두가 지나는 벽에 붙이세요. 직원은 Clock 화면의 파란 Tap to Scan NFC를 누르고 폰을 스티커에 대면 출근, 퇴근할 때 한 번 더 대면 퇴근입니다. 붙인 스티커는 NFC Tags 메뉴에서 확인할 수 있습니다.The sticker comes already registered to your store. Put it on a wall everyone passes, like the staff entrance or the kitchen door. Staff press the blue Tap to Scan NFC area on the Clock screen and hold the phone to the sticker to clock in, and do it again to clock out. Your stickers are listed under NFC Tags.

왜 PIN보다 NFC를 권할까요?Why NFC over PIN? 스티커에 폰을 대는 동작은 그 자리에 있어야만 가능하고, 위치 확인까지 함께 되기 때문에 대리 출석이 사실상 불가능합니다. PIN은 스티커가 없을 때의 임시 방법으로 생각하시면 됩니다. Tapping a sticker only works if you are physically there, and the location check runs at the same time, so buddy punching is effectively impossible. Treat PIN as the stopgap until the sticker is on the wall.
Employee app Clock screen with NFC and PIN toggle and the Tap to Scan NFC area
직원 앱 Clock 화면. 위쪽에서 NFC와 PIN을 고릅니다.The Clock screen. NFC or PIN is chosen at the top.
An employee holding a phone to a Simplin NFC sticker on a kitchen wall
그다음은What comes next

매일 하는 일은 세 가지뿐입니다Day to day, there are only three things

설정이 끝나면 대시보드에서 하는 일은 근무 기록 확인, 급여 마감, 팀 메시지 정도입니다. 나머지는 자동으로 돌아갑니다.Once set up, the dashboard is for checking hours, closing payroll, and messaging the team. Everything else runs on its own.

Timesheet

근무 기록 확인Review hours

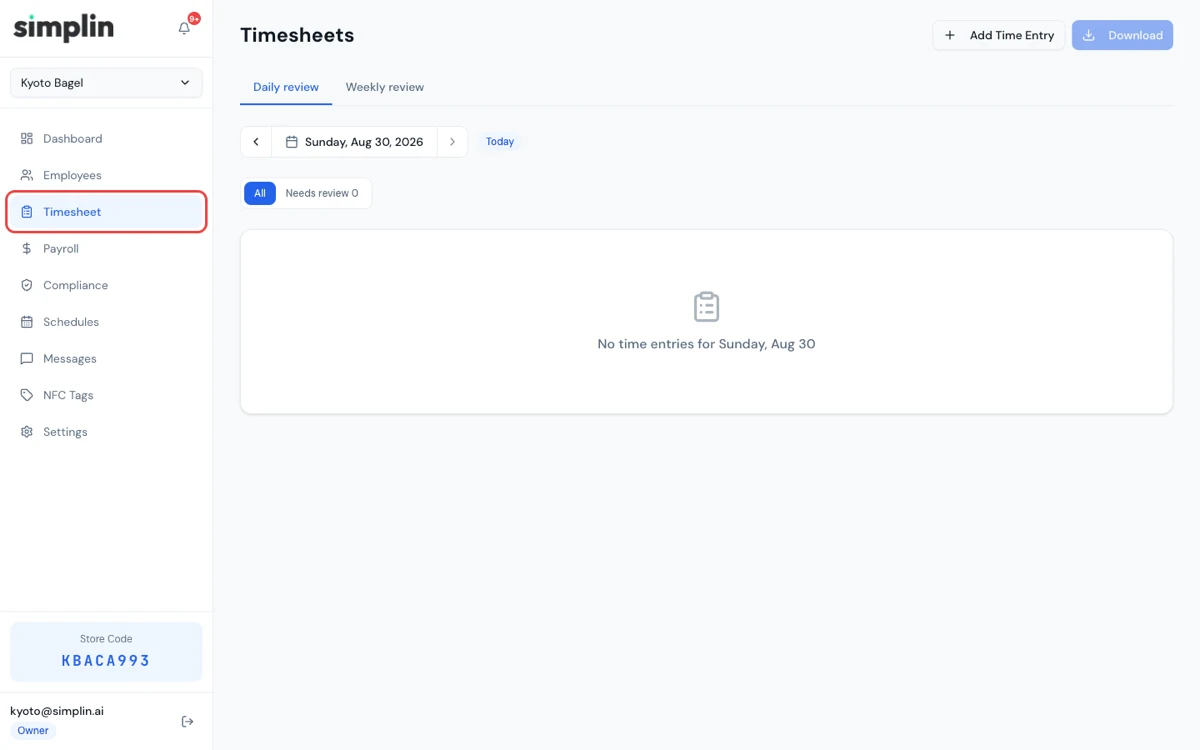
매일의 출퇴근이 사람별로 정리됩니다. 빠진 퇴근이나 잘못 찍힌 기록은 여기서 바로 추가·수정하세요. 수정 이력은 자동으로 남습니다.Every day's clock-ins and outs, by person. Missing clock-outs or wrong entries can be added or corrected right here, and every edit is logged.

Timesheet page listing time entries
Payroll

급여 마감Close payroll

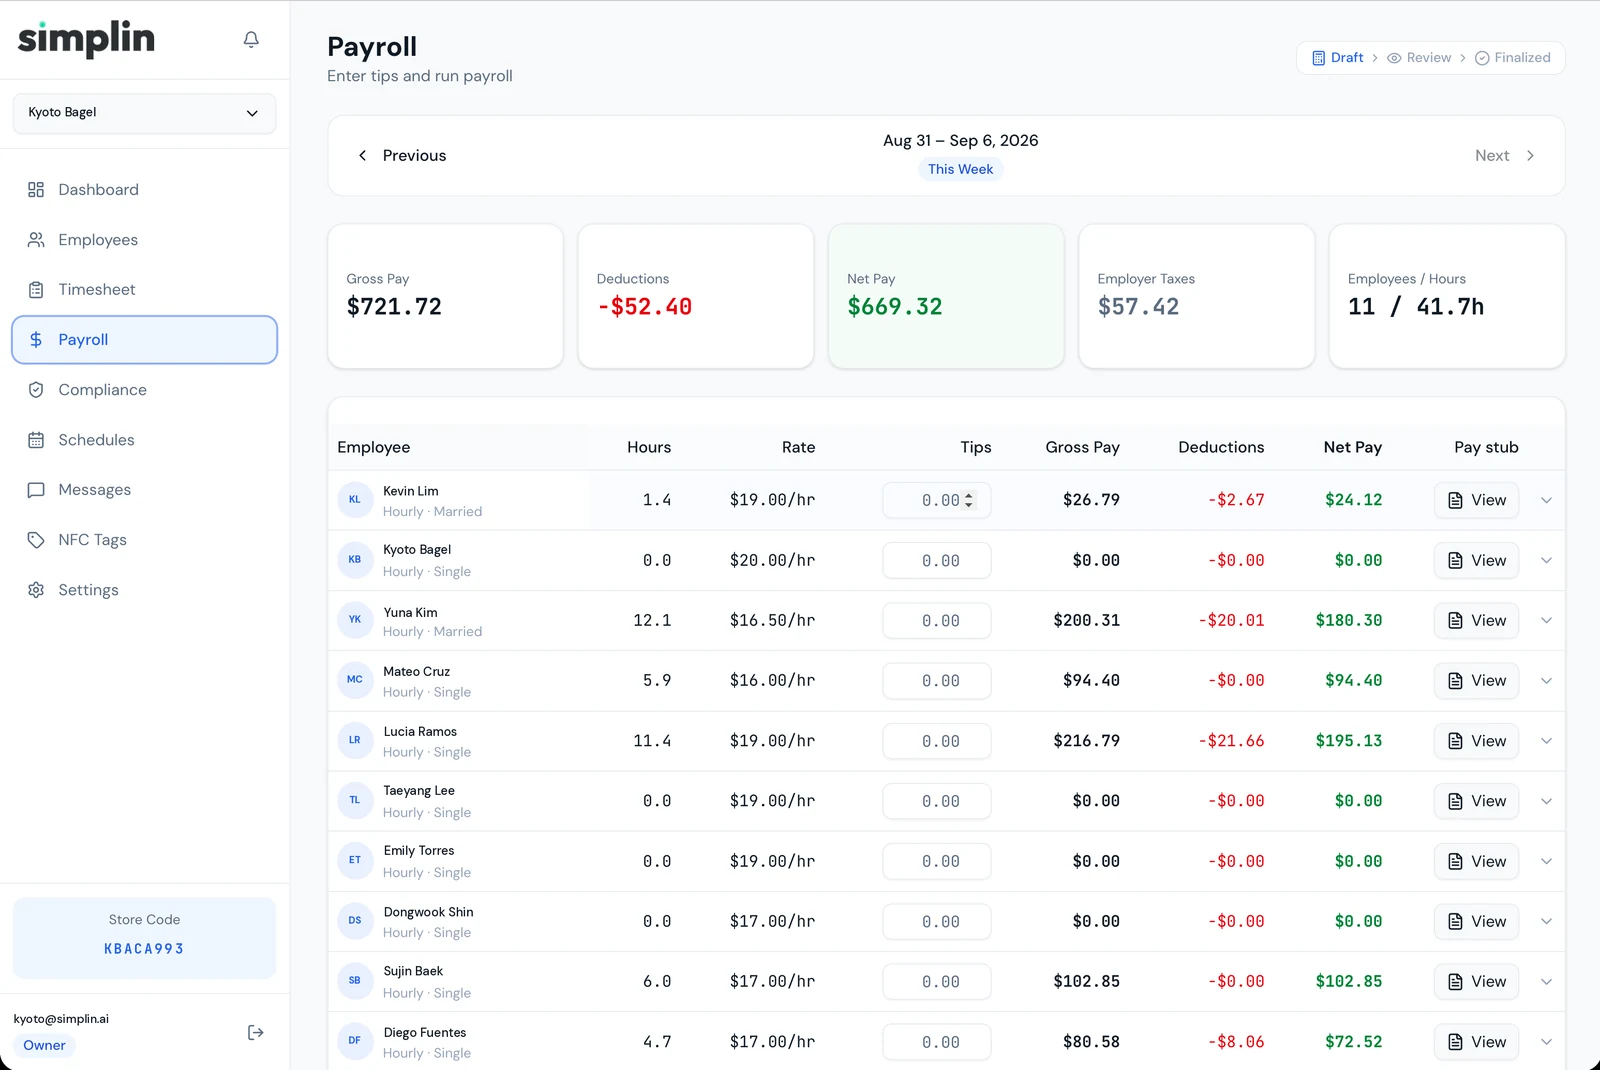
급여 기간이 끝나면 Payroll에서 기간을 고르세요. 세전 급여, 원천징수, 실지급액까지 계산된 리포트가 나오고, Settings에 회계사 이메일이 있으면 자동으로 전달됩니다.At the end of a pay period, pick it in Payroll. You get gross pay, withholding, and net pay calculated, and if an accountant email is set it is sent automatically.

급여 명세서는 여기서 바로 보냅니다Pay stubs go out from here

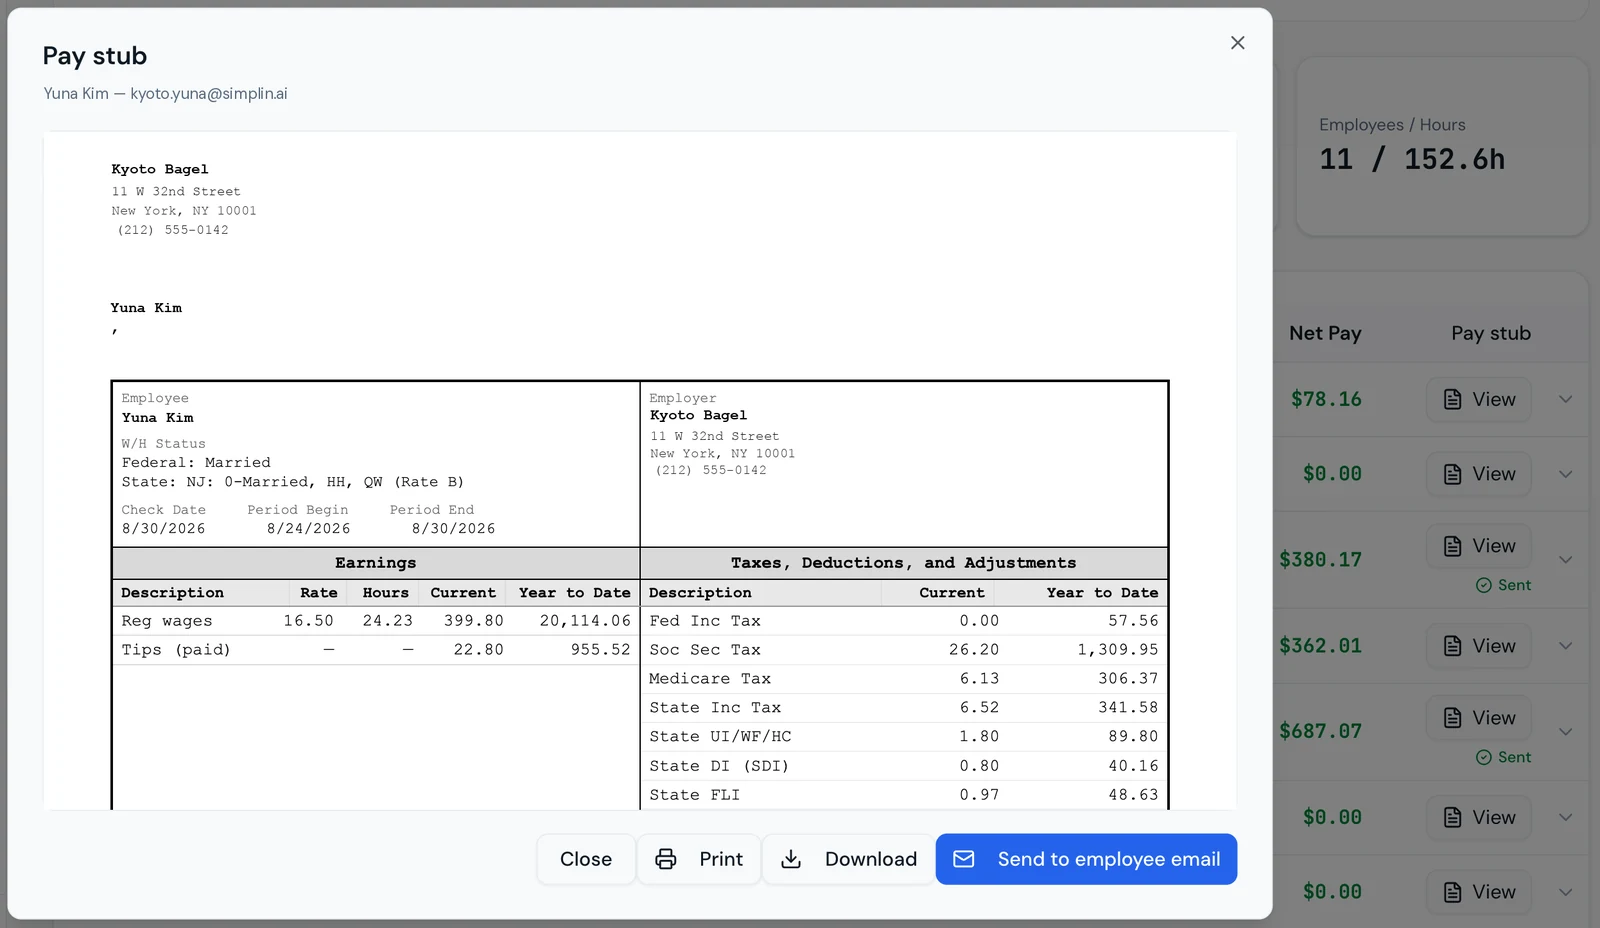
마감한 기간의 직원 줄에서 View를 누르면 그 직원의 급여 명세서(Pay stub)가 열립니다. Send to employee email을 누르면 직원 이메일로 바로 발송되고 줄에 Sent 표시가 남습니다. 직원이 예전 명세서를 다시 달라고 하면 Previous로 그 주를 찾아 같은 방법으로 보내면 됩니다. 인쇄와 PDF 다운로드도 됩니다.On a closed period, press View on an employee's row to open their pay stub. Send to employee email delivers it right away and the row shows Sent. If someone asks for an old stub, use Previous to find that week and send it the same way. Print and PDF download are there too.

Payroll page with a pay period summary
Pay stub preview dialog with Print, Download, and Send to employee email buttons
Compliance

고용 서류, 빠진 것만 보입니다Hiring paperwork, only what is missing

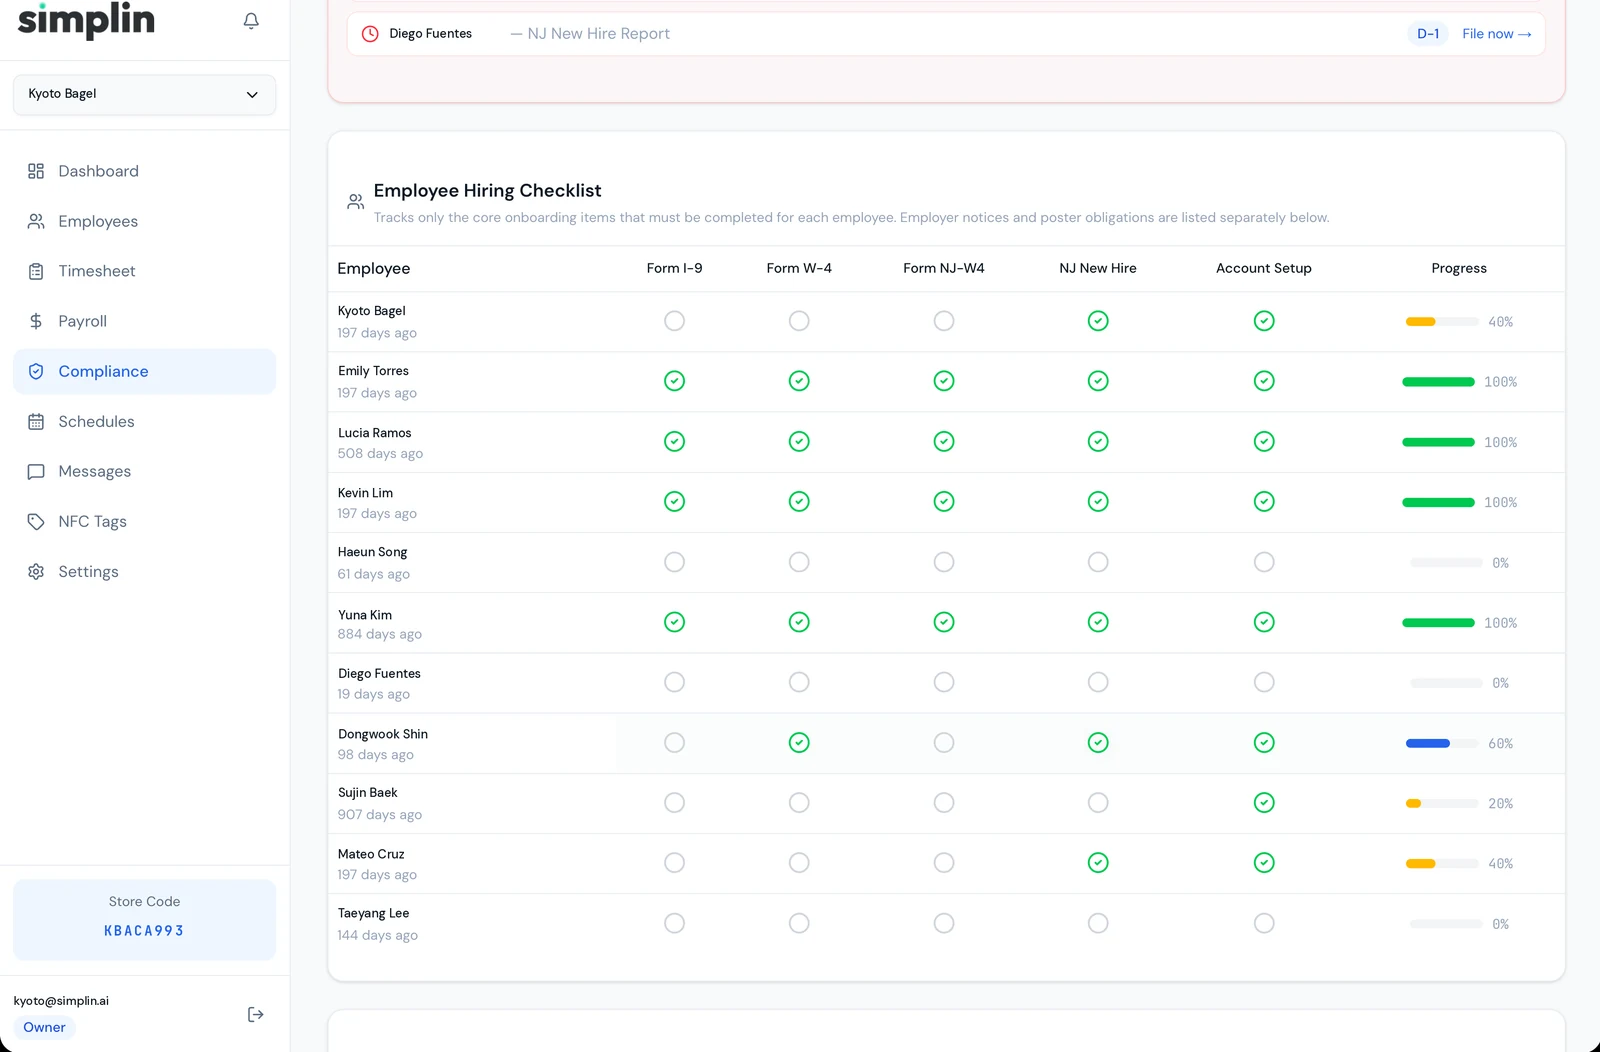
직원마다 법으로 갖춰야 하는 서류(I-9, W-4, 주 W-4, 신규 채용 신고, 계정 설정)를 체크리스트로 관리합니다. 기한이 지난 항목은 위쪽 Upcoming Deadlines에 며칠 지났는지와 함께 올라오고, File now를 누르면 신고 페이지로 이어집니다. 회계사에게 "무엇이 빠졌는지"를 이 화면 하나로 보여 주면 됩니다.A checklist per employee of the paperwork the law requires: I-9, W-4, state W-4, new hire report, and account setup. Overdue items rise to Upcoming Deadlines with the days overdue, and File now takes you to the filing page. Show your accountant this one screen to answer "what is missing".

Compliance page with upcoming deadlines and the per-employee hiring checklist
Messages

언어가 달라도 팀과 대화Message the team in any language

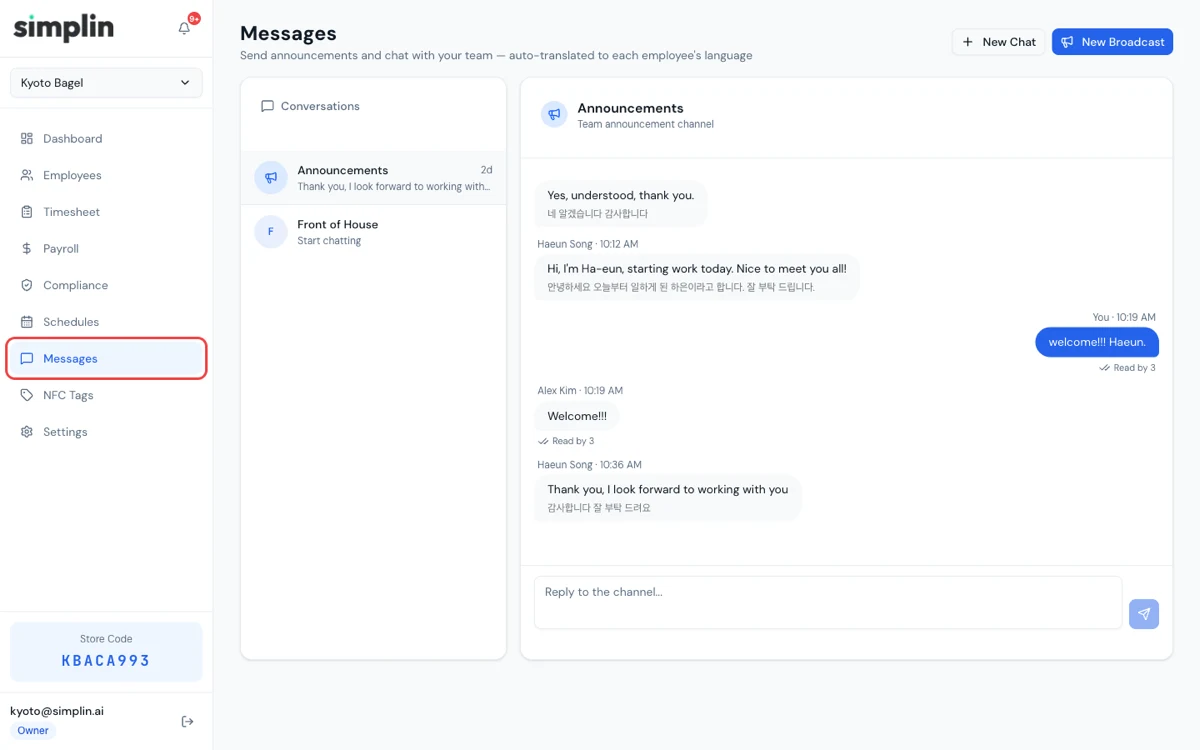
공지든 1:1이든 사장님 언어로 쓰면 직원 앱에는 각자 설정한 언어로 번역되어 도착합니다. 답장도 사장님 언어로 번역되어 옵니다.Write announcements or direct messages in your language. Each employee receives them translated into the language set in their app, and replies come back translated for you.

Messages page in the dashboard

자주 묻는 질문Frequently asked questions

NFC 스티커는 언제, 어디로 오나요?When and where does the NFC sticker arrive?
가입 확인 후 Simplin이 매장 정보에 맞춰 스티커를 만들어 가입 시 입력한 매장 주소로 보내드립니다. 도착 전에도 앱이 연결된 직원은 PIN으로 출퇴근을 찍을 수 있습니다. 배송 관련 문의는 support@simplin.ai로 보내 주세요.After your account is confirmed, Simplin makes a sticker for your store and ships it to the address you signed up with. Until it arrives, connected staff can clock in with a PIN. For shipping questions, email support@simplin.ai.
확인 메일이 오지 않아요.The verification email never came.
스팸함과 프로모션 탭을 먼저 확인하세요. 그래도 없으면 Sign In 화면에서 같은 이메일로 로그인을 시도해 보세요. 이메일 주소를 잘못 입력했다면 support@simplin.ai로 알려 주시면 바로잡아 드립니다.Check spam and promotions first. If it is still missing, try signing in with the same email from the Sign In page. If you mistyped the address, email support@simplin.ai and we will fix it.
직원이 매장 밖에서 출근을 찍을 수 있나요?Can staff clock in from outside the store?
아니요. NFC든 PIN이든 폰 위치가 매장 주소 반경(기본 50m) 안에 있어야 기록됩니다. 반경 밖에서는 앱이 위치 안내를 띄우고 기록하지 않습니다.No. With NFC or PIN, the phone has to be within the store radius (50 m by default) of the store address. Outside it, the app shows a location message and records nothing.
매장 주소를 잘못 넣었어요.I entered the wrong store address.
Settings의 Business Information에서 주소를 고치고 Save Business Settings를 누르세요. 매장 위치와 시간대가 함께 갱신됩니다.Fix it under Business Information in Settings and press Save Business Settings. The store location and time zone update together.
직원의 PIN은 어디서 보나요?Where do I find an employee's PIN?
Employees 화면에서 직원을 누르면 상세 정보에 PIN이 있습니다. 직원 등록 시 자동으로 만들어지며 편집 화면에서 바꿀 수 있습니다.Open the employee from the Employees page. The PIN is in the detail view. It is generated when you add the employee and can be changed in the edit form.
매니저에게도 관리 화면을 주고 싶어요.I want my manager to have a management view too.
Employees에서 해당 직원의 편집 화면을 열고 Manager App Access를 Manager 또는 Admin으로 바꾸면 Simplin Manager 앱을 쓸 수 있습니다. 자세한 방법은 Simplin Manager 앱 가이드를 보세요.Open the employee's edit form under Employees and set Manager App Access to Manager or Admin. They can then use the Simplin Manager app. See the Simplin Manager guide for details.
직원 폰에서 앱 설치와 연결은 어떻게 하나요?How do staff install and connect the app?
초대 링크만 있으면 폰이 안내합니다. 직원에게 보여줄 화면별 설명은 직원 앱 가이드에 정리했습니다.The invite link guides them through it. The employee app guide shows every screen, so you can share it with staff.

준비됐나요? 5분이면 가입이 끝납니다.Ready? Sign-up takes five minutes.

가입하면 스티커가 준비되는 동안 직원 등록과 스케줄을 먼저 끝내 두세요. 스티커가 오면 붙이기만 하면 됩니다.Sign up, then get staff and schedules ready while the sticker is on its way. When it arrives, just put it on the wall.